Per Ben Jordan . . .
What 3rd Party Autorouters work with Altium?
As for 3rd party routers... SPECCTRA as mentioned yes, but also using the same transfer formats, Konekt ELECTRA and Eremex TOPOR work well. My pick of those would be TOPOR. But, depending on what your needs are, the built in Situs router can produce good results *if* you know how to use it, and *if* the design constraints are suitable. It won't do DDR or length tuning. The interactive ActiveRoute is what you want for those...
Found on LinkedIn: See Altium Designer Users Group
'via Blog this'
Thursday, May 3, 2018

Thursday, April 26, 2018
Pin Swapping
Pin Swapping
Problem: Cannot be Swapped ?

Solution: Project Options > Options Tab > Allow for Pin Swapping

Pin Swap Methods:
Controlling How the Swaps are Performed on the Schematic
Notes:
Pins and tracks must NOT be fully routed or be connected (shorted) to other nets.
Problem: Cannot be Swapped ?

Solution: Project Options > Options Tab > Allow for Pin Swapping

Pin Swap Methods:
Controlling How the Swaps are Performed on the Schematic
In the PCB editor pin, pair and part swaps are performed by exchanging nets on component pads and corresponding copper. When the changes are merged into the schematics there are two ways that a pin swap can be handled, either by swapping the pins on the component symbol, or by swapping net labels on the wires attached to the pins. Each approach has its advantages and disadvantages.
Performing the swap on the schematic by swapping net labels can only be done if the connectivity is established through the net labels, that is, if the pins are not hard-wired together. The advantage of this approach is that the component symbol does not change, and can be updated from the library at a later date. This approach is the best choice for a complex component, such as an FPGA.
Notes:
Pins and tracks must NOT be fully routed or be connected (shorted) to other nets.
That's It !
Monday, April 2, 2018
Allegro - Convert Binary to ASCII
REM Convert Allegro Binary to Allegro ASCII (*.brd to *.alg)
REM Place *.brd file, Allegro2Altium.bat and AllegroExportViews.txt in C:\A2A
REM Run the A2A.bat file in the C:\A2A folder on a PC with Allegro Installed
REM Open a Command Prompt > chdir C:\A2A
REM Enter: A2A.bat
REM For large designs the process can take several minutes.
REM You can minimize the Command window to the Task Bar.
REM Do not close the Command Window until the conversion is finished.
ECHO on
Allegro2Altium "*.brd"
REM Place *.brd file, Allegro2Altium.bat and AllegroExportViews.txt in C:\A2A
REM Run the A2A.bat file in the C:\A2A folder on a PC with Allegro Installed
REM Open a Command Prompt > chdir C:\A2A
REM Enter: A2A.bat
REM For large designs the process can take several minutes.
REM You can minimize the Command window to the Task Bar.
REM Do not close the Command Window until the conversion is finished.
ECHO on
Allegro2Altium "*.brd"
REM If needed rename AllegroASCII.txt to AllegroASCII.alg
REM end of A2A.bat file
click on images to view


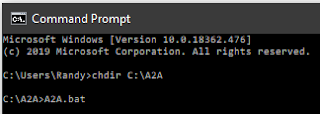
Notes:
Allegro2Altium.bat and AllegroExportViews.txt can be found at:
"C:\Program Files\Altium\ADxx\System\AllegroExportViews.txt"
"C:\Program Files\Altium\ADxx\System\Allegro2Altium.bat"
Refer to: Allegro Import | Online Documentation for Altium Products
Tips:
When using the Import Wizard, there will be several forms that open to allow you to select the file(s) you are converting. In the case of the Allegro files, the first form will accept the Design (*.BRD or *.ALG) files, the second form will import Constraints files and the third form will import the footprint (*.DRA) files.
During the import process, if you are only interested in importing the *.DRA files, skip past the first two forms and then only import the footprint files.

That's it !

Notes:
Allegro2Altium.bat and AllegroExportViews.txt can be found at:
"C:\Program Files\Altium\ADxx\System\AllegroExportViews.txt"
"C:\Program Files\Altium\ADxx\System\Allegro2Altium.bat"
Refer to: Allegro Import | Online Documentation for Altium Products
Tips:
When using the Import Wizard, there will be several forms that open to allow you to select the file(s) you are converting. In the case of the Allegro files, the first form will accept the Design (*.BRD or *.ALG) files, the second form will import Constraints files and the third form will import the footprint (*.DRA) files.
During the import process, if you are only interested in importing the *.DRA files, skip past the first two forms and then only import the footprint files.
Related:
Extracta.exe
The PC with Cadence OrCAD / Allegro installed must have a System Environment Variable named Path that points the Installation folder tools\bin where extracta.exe is installed.
Control Panel > System > Advanced System Settings . . .
Example - System Environment Path Variable for OrCAD X
That's it !
Thursday, March 8, 2018
Port Cross References
My Preferred Port Cross References
%20Beta%20Features%20Enabled.png)
%20Beta%20Features%20Enabled.png)
click on images to view

DXP Preferences

Sheet Style > Number
Location Style > Zone
That's it !

DXP Preferences

Sheet Style > Number
Location Style > Zone
That's it !
Wednesday, February 28, 2018
NETS - Show Connections
To display Nets for selected Components
Click on image to view

Watch the Video:

Vote for Idea: #9095: AD18 - Show Selected Components Nets
Tip: View > Connections > Show . . .
Click on image to view

Watch the Video:
Vote for Idea: #9095: AD18 - Show Selected Components Nets
Tip: View > Connections > Show . . .
Subscribe to:
Posts (Atom)